BTCStick Howto
Posted on Tue 26 November 2019 in misc
Introduction
This manual describes the content and usage of the “BTCStick” USB pen drive. This is a bootable USB disk image that contains various bitcoin related tools to use offline. The system was developed for the author’s personal use case to safely run such tools. The stick was inspired by the Bitkey project which provides a similar environment but the approach differs somewhat. A zip file containing an image which can be written to a USB thumb drive is provided via Google Drive, accompanied by a PGP signed file to verify the consistency of the file. The content of the system is based on personal preferences of the author but may be modified to suit your own needs. Ideas to improve the system are always welcome via mail at btcstick@hamal.nl.
Base system
The pen drive is a standard installation of Ubuntu Linux (18.04 a.k.a. Bionic Beaver) with the Mate desktop environment and can be booted via UEFI (including on systems with the secure boot option enabled) or via Legacy BIOS. After a standard boot, the system will lack any network device and boot with a “tmpfs overlayroot” (i.e., all filesystem writes except for writes on extra mounted file systems are volatile). This can be overridden by choosing a different boot option from the GRUB boot menu.
The system has a couple of shell scripts that enable creating and using a file on an auto-mounted filesystem (e.g. a second USB stick) that contains an encrypted filesystem. This filesystem is encrypted using a password that is generated from user input and the serial number of the USB device it resides on, thus upping the ante for decrypting a copy of the file (see the “pseudo-2FA” chapter below). The pen drive should fit on a standard 8GB USB stick.
Creating the bootable USB device
The system image should be written to the raw USB device. If you’re using a version of Windows to write the image to a USB stick, you will need a special tool like Rufus. If you’re on a Mac or on another Linux system, you can use the “dd” tool in a terminal to write the image to the device. The latest version of the zip file can be obtained via https://ham.al/btcstick (which redirects to a zip file on Google Drive). The zip file contains the image file (btcstick‑version.raw) and a text file containing a PGP signed hash of the image. The PGP public key with id "d1f8ffb9 f7a0f7a0" can be retrieved from a public key server, e.g.: http://keyserver.ubuntu.com/pks/lookup?op=get&search=0xd1f8ffb9f7a0f7a0. The verification of the SHA256 hash and PGP signature is left as an exercise for the reader.
To use “dd” on MacOSX or Linux, you need to determine what device file
the USB stick is mapped to. On the MacOSX terminal you can use the
“diskutil list” command to identify the device. On Linux you can view
the logging of the “dmesg” command after inserting the USB stick to
find the device. Make sure you write the image to the full device, not to a
partition on the device. When writing the image, make sure that you do not
overwrite your hard disk! As an example, if your USB device is
/dev/sdc and you extracted the image in /tmp, the command
could be:
dd if=/tmp/btcstick-1.0.raw of=/dev/sdc bs=32M
The prompt could return before the system has finished writing, you could
use the “sync” command to make sure the writing has finished before
removing the USB device.
Boot methods
I chose to use Ubuntu for this project because it is one of the few Linux distributions that can be booted on a computer with secure boot enabled. The process that I followed for the installation can be found at this page (except for the encrypted root part which is not needed here).
When booting, the default grub menu option will not pass any extra kernel boot option. Without extra kernel parameters the overlayroot will be enabled, i.e. the writes to the system will go to a ramdisk and will not last after the next boot (this is not the case for writes to the /boot/efi partition which is persistently mounted). It can be undone by booting with the “overlayroot=disabled” boot parameter. Also, a script will run that will look for physical network devices in the /sys tree and use that interface to remove the device from the kernel. I consider this a firm guarantee that the system will boot without network connectivity. This can be disabled by booting with the “nonetdisable” boot parameter.
There is an extra menu in grub named “BTCStick in persistent and/or online mode”. That provides boot options with either the “overlayroot=disabled” or “nonetdisable” options, or both.
After booting the user “btc” automatically logs into the graphical environment. This user can use “sudo” as root for any command without providing a password. If you somehow still need the password, it is “2theMoon!”. Password access for the user root has not been enabled.
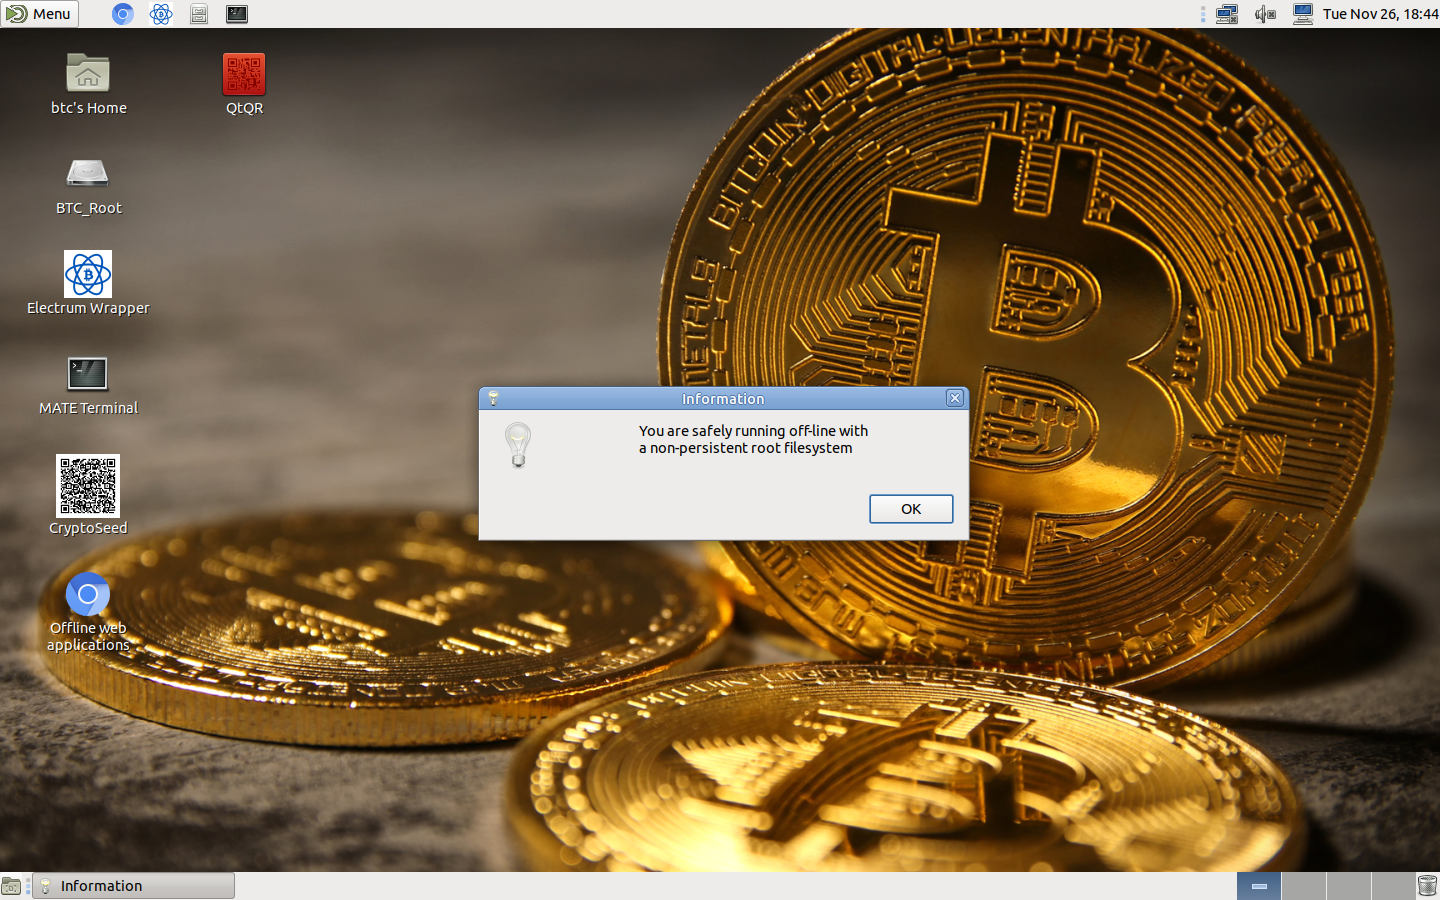
When booting with any of the two boot parameters, you get a warning popup that either the filesystem is in persisitent mode, or network devices have been detected, or both. If you boot offline and non-persistent, you get an info popup informing you of this and the desktop wallpaper is modified.
System content
The main application that I created this stick for, is the Electrum wallet. Inspired by Bitkey, I created a wrapper script that will mount an encrypted filesystem on a file on a USB stick and run Electrum from that. The encryption password is however not the password provided by the user, but a password generated from both the user provided password and the serial number of the USB device the file resides on (see the “Pseudo-2FA” chapter below).
I installed a udev rules file for the Ledger, ColdCard and KeepKey hardware wallets but did not try them myself as I don’t own any of those. For the Trezor (which I do have) I installed and tested the trezor-bridge daemon. Since I created the disk for myself, I have not included tools on it to manage altcoins. I have no need for those. You’re free to modify the image and add such tools to manage your own needs.
Applications
-
Electrum (https://www.electrum.org/)
Electrum has been installed from the source code in a separate Python virtual environment (under /usr/local/lib/venv). With it I also installed the python modules for different hardware wallets and that includes some command line utilities. I wrote a script and put some symbolic links to it in /usr/local/bin which activates the the virtual environment and runs the binary with the same name. This enables the following commands:- electrum
- ckcc (ColdCard utility)
- keepkeyctl
- trezorctl
- u2f-authenticate and u2f-register
-
CryptoSeed (https://github.com/anderson-arlen/cryptoseed)
This provides a way to encrypt the BIP39 seed to your wallet(s) and present the encrypted result as a QR code. It cannot read QR codes itself, when you need to decrypt the seed you need another tool to scan the QR code and copy/paste it into CryptoSeed. -
QtQR (https://launchpad.net/qr-tools)
This is a graphical frontend to the python-qr tools with which you can create QR codes from text input or decode QR codes that are either read from a file or from the webcam. -
KeePassX (https://www.keepassx.org)
This is an open source password manager that uses a local encrypted database.
Web Applications
The web applications below have been installed. For that, lighttpd has been installed and a page that links to the various web applications has been placed as the main page. The Chromium browser has been installed (and placed on the desktop and the panel) and has been configured to use this page as the default page. The idea is to use these web applications while being offline
-
coinb.in
This is a web wallet that includes a couple of features like signing raw transactions. The wallet itself is not usable without an internet connection. -
bitaddress.org
This is one of the most popular paper wallet generators that cointains some other features like creating split wallets, brain wallets, BIP38 key encryption and decryption etc. -
bitcoinpaperwallet
This is another paper wallet generator with a different fold system.
Warning:
no paper wallet generator should be used online but this one needs a special mention. In 2018 the site has been sold and the changes to the site seem to indicate that the new owners might not have the best interest of the user at heart. The included version does not contain those changes. -
Segwitpaperwallet
Like the name implicates, this generates paper wallets with segwit addresses. By default, it will generate P2SH wrapped segwit addresses. If you prefer bech32 adresses, insert “/bech32” before “/index.html” in the URL. Also note that currently not many wallets can sweep segwit addresses. It’s possible with Electrum but not via the GUI. -
Warp brain wallet
This is a wallet that uses a salt (an email address) along with the passphrase to generate a brain wallet. In addition, it uses the “scrypt” memory hard hashing algorithm to generate the private key i.o. plain SHA256. -
BIP39 Code Converter
This can generate BIP39 seed phrases or use a seed from input and derive the master private and public keys given various derivation paths. -
Two-factor Bitcoin
This app is a system that uses BIP38 encryption to do a two party transaction between untrusted peers. I mainly use it as an easy way to do BIP38 encryption and decryption of private keys. -
Electrum Base43 conversion
Electrum uses an own data format for representing a transaction, which means you need an online Electrum to broadcast such a transaction. With this app you can convert the transaction to a format that can be broadcast by e.g. Bitcoin Core. -
Key compression tool
Given a public or private (WIF or BIP38 encrypted) key, it will show both the compressed and uncompressed addess. -
Password Strength Estimation
A simpe tool that uses Dropbox’s “zxcvbn” algorithm to estimate how easy a password can be cracked.
Command-line tools
Here are some tools that are installed in the system, some are installed from the Ubuntu software repository, some are installed seperately.
-
bitcoin explorer
“bx” is a very versatile command line tool with way to many subcommands to summarize. Check the documentation by using “bx help” or by visiting the github wiki at https://github.com/libbitcoin/libbitcoin-explorer/wiki.
WARNING WARNING WARNING
Do NOT use the"bx seed"command. The tool uses a terribly low entropy for generating the seed and this has never been fixed. If you put sats into a wallet with such a seed, you will lose those sats!
See the MilkSad page for more info. -
zbar-tools
zbarimg and zbarcam, tools to decode QR codes from an image or from the webcam -
rng-tools
Tools and daemon to create a bridge between a hardware TRNG and the kernel’s PRNG -
ssss-split and ssss-combine
Tools to split or combine a secret string into or from multiple strings in an “m of n” system using Shamir’s Secret Sharing System -
vanitygen
Simple tool to find vanity bitcoin addresses and the corresponding private keys.
Scripts
The following scripts have been added to the system:
-
/usr/local/bin/mk2fsluks.sh
This will create a file on a USB stick and create a Luks encrypted filesystem on it. The password is pseudo-2fa generated (see next chapter) and by default the script will fail if the root filesystem is read-write mounted or if network devices are detected. These restrictions can be disabled. -
/usr/local/bin/2fa-mount.sh (and 2fa-umount.sh)
This script mounts (or unmounts) a Luks encrypted filesystem contained in the provided file. By default, the script assumes that the password is pseudo-2fa generated and the root filesystem and network restrictions apply as above. -
/usr/local/bin/electrumrwapper.sh
This script will look for a file named btcstick/electrum.vol, mount it on a temporary directrory start the Electrum wallet from that directory. After Electrum is terminated, the script will continue to unmount and remove the directory. If no file is found, the script will offer to create one with a pseudo-2fa password. The filesystem and network restrictions above apply here as well. -
/usr/local/bin/getusbpasswd.sh
This is a script that is called by the scripts above to return the serial number of the USB device that the provided file or directory resides on or of all available USB mounted filesystems. -
/usr/local/bin/passphrase-zxcvbn
This is a script that I copied from the bitkey.io project, mainly because zenity does not provide a “confirm” dialog when inputting a passphrase. This script is used my the mk2faluks.sh script. The script needs an older version of Python2's python-zxcvbn module. -
/root/bin/removenet.sh
This script will search the kernel datastructure presented in the “/sys” filesystem for physical network devices and remove them from the kernel. The script is called from /etc/rc.local and exits if the “nonetdisable” boot parameter was provided. -
/home/btc/bin/checkoffline.sh
This is a simple script that will test if the overlayroot filesystem is active and if all physical network devices have been removed. It will generate a pop-up accordingly and also modify the desktop wallpaper if both are true. The script is run at the startup of the Mate desktop. -
/usr/local/lib/venv/venvapp.sh A simple script to activate a Python virtual environment and execute a binary with the same name.
Pseudo-2FA
I was inspired by the bitkey.io project for this stick and as stated
above, created a wrapper script that will mount a Luks encrypted filesystem
from a file on a USB disk to start Electrum from, but I wanted to make it even
more difficult to get to the data, so the passphrase for decrypting the file is
generated from two inputs, i.e. the passphrase provided by the user and the
serial number of the USB device that the file resides on. The script that gets
the serial number will use “udevadm” to list the parameters of the USB
device and return the “ID_SERIAL_SHORT” parameter. The passphrase is
calculated as:
base64(sha256(serial_nr|user_pw|"\n"))[0:24]
(i.e., the first 144 bits of the binary sha256 hash of the concatenation of the
serial number, the user password and a newline, represented as a base64
string).
If the USB device containing such a file is retrieved by an adversary and the
algorithm is known, the system collapses to a single factor. If you have a
healthy paranoia you can store the file elsewhere and temporarily copy it to
the USB device where and when it’s needed.
Two caveats:
-
if your USB device becomes unreadable (and you don’t know the serial number by another means), you loose access to the encrypted file. Make sure that you can access the data via another means (e.g. proper seed backups).
-
you should not assume that an adversary cannot retrieve the serial number and brute force the encryption passphrase. This system should not lull you into a false sense of security by choosing a weak user password.
Updating
To update the system you need to boot the system with the root filesystem
persistently mounted and the network enabled. Then you can use apt-get
to update the packages on the system or install new packages.
CAVEAT EMPTOR:
if you update packages like the kernel (any package that modifies the boot
system), it is strongly advised to do the update after booting from a legacy
BIOS system. If you do it on an existing system that you booted with UEFI, it
will modify your EFI bootmanager with an “Ubuntu” entry. If you do this on a
system that already has Ubuntu on it, it will render that system unbootable.
This can be rescued from an Ubuntu live disk but that is not a trivial task.
The safest way to do updates is booting the image from a virtual machine
hypervisor like VirtualBox or libvirt. In the former case you should convert
the image file to VDI format with VboxManage and after updating from within
VirtualBox convert the image back to raw and overwrite your USB disk with the
updated image.
Resizing the partition
You will likely have some room left over on your USB stick. You can either add a new partition using the remaining space or resize the partition to claim the space for the BTCStick itself. To ease that task, gparted is installed on the image. It is advisable to boot with a permanent root filesystem to do this task.
More information and feedback
Feedback is welcome via email at btcstick@hamal.nl.
Please add the word “btcstick” in the subject line to aid in the visibility of
you mail.
The source code for the scripts, local homepage etc. is available via
https://gitlab.com/hamal03/btcstick.
A prebuilt image is available via Google Drive. The link for this image is
available via https://ham.al/btcstick.