Creating a UEFI and BIOS bootable Linux installation on USB
Posted on Thu 27 June 2019 in misc
I had a need for a USB stick with an installed version of Linux that was bootable with UEFI (and Secure Boot) as well as Legacy BIOS. I couldn't use a live stick because I needed to employ an encrypted Luks root filesystem and swap partition because it would contain some files (like ssh private keys) that would be used at work. I wanted it to be bootable with legacy BIOSes as well because I wanted to also use the system as a generic "Swiss army knive" with Live filesystems like Kali and SystemRescueCd and tools like DBAN. This blogs shows how to achieve this.
I opted to install Ubuntu since that is capable of booting on a system that only allows secure boot. To enable this install with Ubuntu Bionic (18.04 LTS) you need the Alternative Ubuntu Server installer since the new installer (Subiquity) does not enable a Luks encrypted LVM with multiple logical volumes.
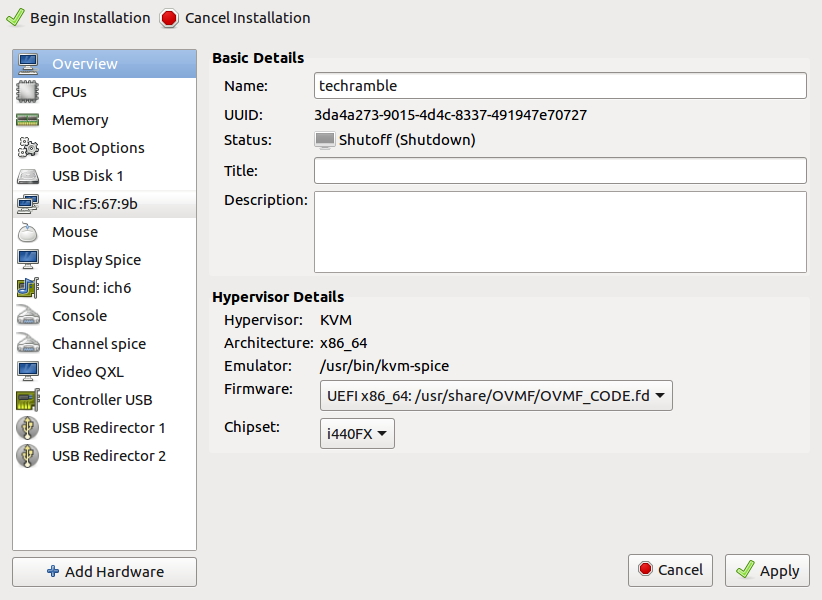
It is advisable to create the installation on a virtual machine like libvirt or VirtualBox because doing an UEFI installation on an existing system (especially an Ubuntu system) may render your system unbootable. It might be rescued but it's at least an annoyance. I opted to run it on libvirt (which uses Qemu/KVM) because that enables it to be installed on a file as a raw disk image, while VirtualBox needs the vdisk to be in VDI format. To do that, I had to install both libvirt and ovmf (Open Virtual Machine Firmware) on my system. Here's what to do next:
Create a file that is distinctly smaller than the intended USB stick:
$ dd if=/dev/zero bs=1G count=0 seek=14 of=usbimage.raw
Create a DOS partition on it with fdisk or parted. If the USB stick has a GPT partition with an EFI partition present, some systems will not present a BIOS boot option.
$ fdisk usbimage.raw
Create a larger than 32MB partition for EFI (leave it as a Linux type for now), a boot partition (I used 500MB) and a large partition for LVM. Before encrypting the LVM partition, it is a good idea to fill it with random data. Connect the file with kpartx and determine the loop device it uses to know what device to fill with random junk. I tend to generate a random stream with AES because that is quite a bit faster than using /dev/urandom and fine for our purpose:
$ sudo kpartx -a usbimage.raw
$ losetup     # check the loop device that is used
$ K=`dd if=/dev/urandom bs=16 count=1 | xxd -p`   # random key for AES stream
$ IV=`dd if=/dev/urandom bs=16 count=1 | xxd -p`   # random IV for AES stream
$ dd if=/dev/zero | openssl enc -aes-128-cbc -K $K -iv $IV | sudo dd \
    of=/dev/mapper/loop0p3 bs=32M    # replace loop0p3 with the proper device
                                     # p3 means the third partition
$ sudo kpartx -d usbimage.raw
Create a VM with virt-manager. Use "Import an existing disk" and select the disk
you just created. Before finishing, toggle the option "Customize configuration
before install. In the Overview section, change the Firmware to UEFI. Select the
disk device and make sure it's connected to a SATA or USB bus (not VirtIO) and
add a CDRom which you connect to the Ubuntu server iso file.
When running the installation you may be asked if you want to force an UEFI
installation. Affirm this. When the disk partitioning menu occurs, opt for the
manual partitioning. Use the small partition as EFI boot partition, and the
larger partition as ext4 filesystem mounted on /boot. Since this will be used
on a USB stick, it's advisable to set the "noatime" and "nodiratime" mount
options. If you will use an encrypted volume group, select the largest
partition to be used as physical volume for encryption. Choose to configure
encrypted volumes and create an encrypted volume.
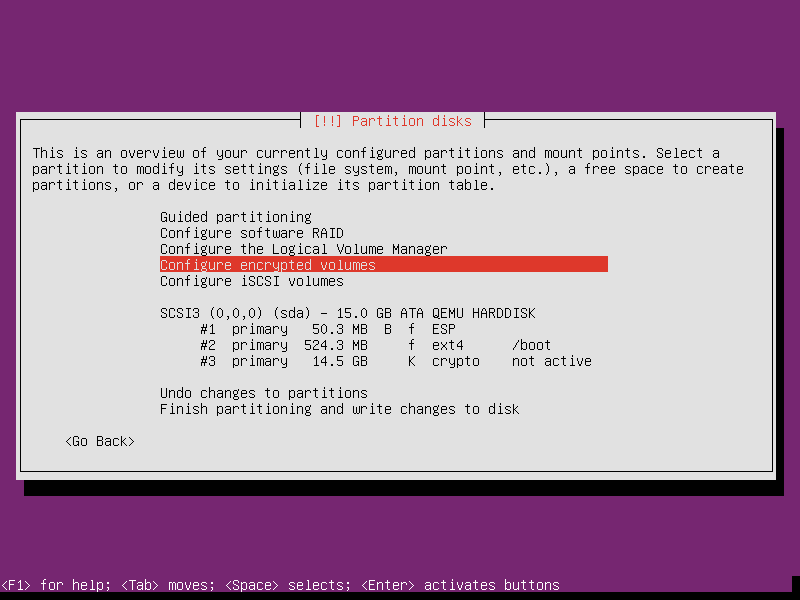
After this the encrypted
partition will be configured to be used as an ext4 filesystem. Change that to
a physical volume for LVM. If you opt not to use encryption, you can use the
partition itself as a physical volume for LVM. Create a volume group on the
encrypted volume (or partition) and create at least two logical volumes, one
for swap space and one for the root filesystem.
Continue the installation and make sure the system boots. If you opted for an encrypted volume group for root and swap, you should be prompted for the password during the boot to decrypt the partition. After the installation, install the packages "grub-pc" and "grub-pc-bin". When requested, install grub on the master boot record. Verify that the system still boots with the UEFI firmware. To make the system bootable on any UEFI bios, copy the directory /boot/efi/EFI/ubuntu to /boot/efi/EFI/BOOT. Mount the installation DVD and copy the file /<cdrom_mount_point>/EFI/BOOT/BOOTx64.EFI to /boot/efi/EFI/BOOT.
To test the Legacy BIOS boot, remove the disk from the VM and create a new VM with the same disk as SATA or USB disk, this time keep the firmware on BIOS. verify that the system boots here as well. To verify that the system will boot on other UEFI systems, remove the disk from the Legacy BIOS VM and create a new UEFI based VM with this disk. Verify that the system boots.
The EFI partition contains only the .efi files to to bootstrap the process and a grub config file that just looks for the grub file on /boot and loads that. You might opt to remove the /boot/efi filesystem from your fstab to prevent changes on that. The system should now be upgradable from both a UEFI as well as a Legacy BIOS firmware. You can now install all needed software. The various desktop all have a meta package to install the whole environment (like ubuntu-gnome-desktop, ubuntu-mate-desktop, lxqt and xfce4).
When you're satisfied with the installation you can copy the image to the USB stick. Insert the USB stick and use lsblk to verify the device that is connected to it (in this example we use sdc). Caveat emptor: this is a tricky command, make sure you're not overwriting your own hard disk!
$ sudo dd if=usbimage.raw of=/dev/sdc bs=32M oflag=sync
If you have space available, you can create more partitions and add some live systems to the stick that you might occasionally use. Modify the file /etc/grub.d/40_custom to create Grub entries for those and use grub-mkconfig to create a grub config file capable of booting those. The howto for this is outside of the scope of this article.
Enjoy your USB installation!